The point of this instruction is that you can create a personal cover page which you can save for future use.
Step 1. Choose first a blank page of your document.
Do not choose cover page in the Insert menu! The Cover Page menu only gives ready made cover and they do not correspond with the format you should use.
Step 2. Put in Hankens logo on the page.
Save Hankens logo on your computer and paste it on the blank pages right upper corner. Välj Choose Align right in paragraph menu so that the logo will come on the right placement.
Right click on the picture of the logo and choose Size and position. The Height and Width should be 3 cm.
Steg 3. Write in Title, Author, Institution and Year.
If you have changed the basic settings according to 1.4 then you have the fonts and sizes of the text already to use. Choose the appropriate styles. You can even write your name and the location you are studying in (either Vasa or Helsingfors).
Style Chart:
| Title | Georgia 19 | (Centered) |
| Author | Georgia 16 | (Centered) |
|
Institution Svenska handelshögskolan Location Year |
Georgia 12 | (Centered) |
| Margins | Top: 2,54cm Bottom: 2,54cm | Left: 2,54cm Right: 2,54cm |
| Line and paragraph spacing | 1,5 |
The page should look like this:
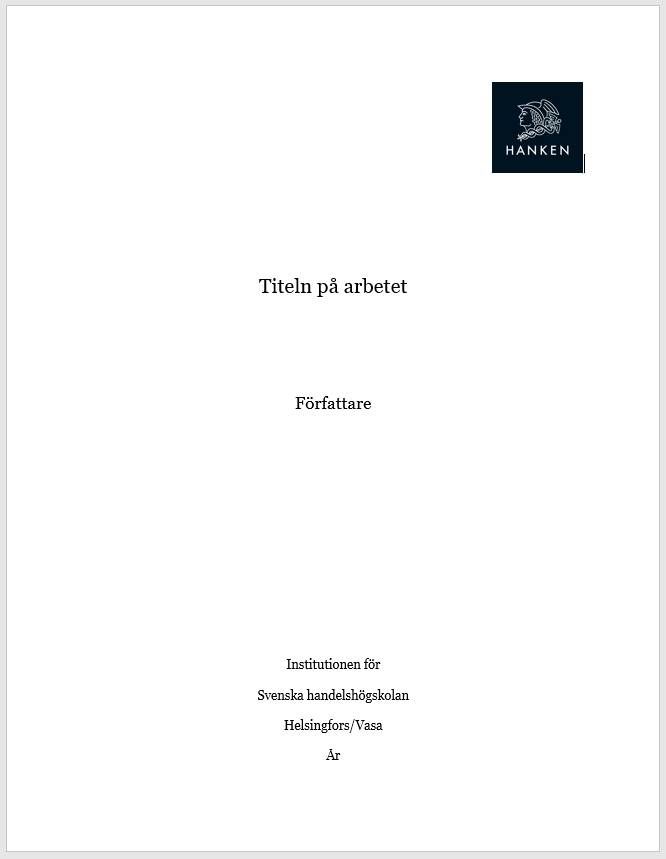
The important thing with the appearance is that Institution, Svenska Handelshögskolan, Location and Year are at the bottom of the page without going over the page.
Save the page (Optional)
The instructions below are optional and you do not need to use them in order to complete the course. They are here if you want to save the cover page you just created, but we recommend that if you want to save a cover page you do it according the advanced skills instructions. This way you can use a correctly formatted cover page whenever you start a new text.
Step 4.1. Windows: Save the page as a Cover Page
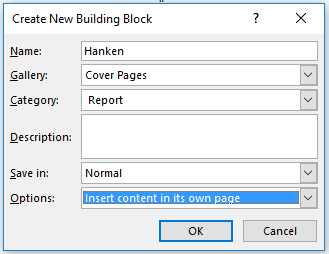
Highlight the page with your mouse so that it can be copied. Choose the Insert menu and Cover Page.
Choose Save Selection to Cover Page Gallery.
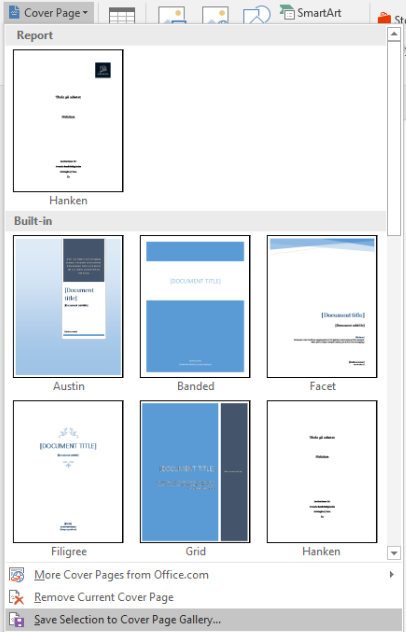
Give the Cover Page a name so that you can find the cover in the future.
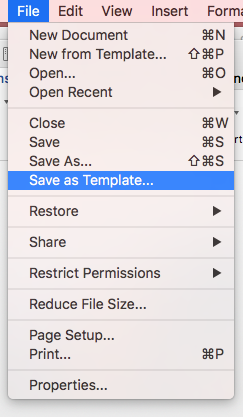
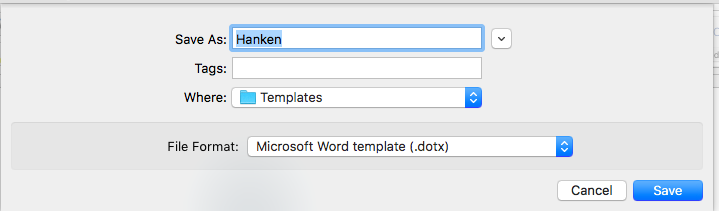
Step 4.1. Mac: Save the page as a template.
For Mac users the above method does not work. You need to save the page as a template. It is recommended that you save everything to template after you have completed all the correct formats for the document. You can create a template where the sections (3), page numbers (4) and table of contents (7) are preset in the document. When the cover page looks like it should and the formatting is correct you should choose File and Save as Template:
Step 5.1. Windows: Choose the new cover page and write in the relevant information!
The page you created and saved according to these instructions is only a normal page. You must choose the new cover page from Insert > Cover Pages so that the document recognizes that the page is a cover page. When you have got the actual cover page you can erase the text and picture you used to create the cover page. Otherwise you will have two similiar looking pages. Remember to save the changes! When you close the Word program for the first time after you created the cover page the Word program will ask if you want to save. Answer yes! In future you can access the cover from Insert > Cover Pages! Write in the relevant information such as your name and the title of the assignment you are doing.
Steg 5.2. Mac: Write in the relevant information!
In this assignment you do not need to choose a new file because you already have all the correct settings (as long as you followed the the Formatting Guides instructions). As long as you have saved your settings and the cover page as a template you can write in the relevant information on the cover page such as your name and the title of the assignment you are doing.
In the future you can choose the same settings and cover page whenever you choose a new document in Word New from Templates: